How to dual boot Pop!OS 22.04 on MacBook Pro (2020)
Originally posted by me on reddit because community asked. This thing is a bit advanced, but I believe it will greatly increase the privacy of your time spent at your laptop and it will definitely give you much more control over your system.
Important thing to note is: as long as you are dual booting, you can reverse these changes (your macOS will erase Linux easily) and get back to what it was before. If you decide to go full Linux and erase macOS, there's be no way back. So dual booting is much better option if you still need your macOS.
Another thing is this stuff is experimental. MacBooks are not intended for this. At all. But I did it years ago and never there's been a moment where I did regret it. While you can install Linux on M-chips, it's a much better idea to not to do that and only proceed if you have an Intel chip.
This guide covers installation of Pop!OS distro, but it will be very similar to install any other distro as well.
Now with this part being over, below are the instructions I followed to dual boot Pop!OS on my Mac.
Important preparations before installation. Read carefully.
Mac's keyboard and touchpad weren't working in Pop!OS by default, so you need an external keyboard (simple Logitech worked for me) or mouse to navigate through the installation. Mouse is preferable at the partitioning stage, keyboard at the post-install stage — creating passwords, typing in terminal, etc.
In case of a usual USB drive and keyboard/mouse plug, you'll also need at least two (better three) USB-to-Type-C adapters — you can switch keyboard and mouse on demand.
WiFi isn't likely to work by default either, so you'll need a way to connect to the web. Android tethering works well for this (I don't know if it's possible with iPhones).
I used the Nvidia version of Pop!OS, the same I used for my PC.
1. Create bootable USB installer
Briefly:
- Prepare a flash drive 4GB+
- Download official distribution: https://pop.system76.com/
- Download balenaEtcher: https://www.balena.io/etcher/
- Connect those three and make a bootable flash drive
2. Partition macOS (skip if you want a clean install)
- Go to Disk Utility
- Make sure it's set to show all devices (top left)
- Select your drive and click Partition
- Click Partition in the opened window
- Click + under the chart to add a new partition
- Choose the size you need — name doesn't matter
- Format to MS-DOS (FAT) and click Apply
- Agree with everything you're asked about

3. Allow Mac to use other bootable devices
- Restart Mac and hold Cmd + R
- Authenticate and go to Utilities in the menu bar, choose Startup Security Utility
- Under Secure Boot — pick No Security
- Under External Boot — pick Allow booting from external media
- Exit

4. Prepare to install
- Reboot Mac holding Alt
- Pick your USB drive (most likely labelled EFI, UEFI, or something similar)
- At this point no input devices will work — connect your mouse and go through the language selection until you arrive at the clean/custom install option
- There was an error for me here because the changes from sections 3 and 4 weren't saved. I repeated the previous section and it worked.
- Click the Custom (Advanced) option (or Clean Install if you don't want to keep macOS)
- Click Modify Partitions at the bottom right

5. Partitioning (skip if you don't want to keep macOS)
The best way is to watch this video and repeat the steps: https://youtu.be/Zt1AbkV3zV0
These articles also helped:
- https://fostips.com/install-pop-os-22-04-usb/
- https://samarthrawat1.hashnode.dev/dual-boot-pop-os-the-right-way
My steps:
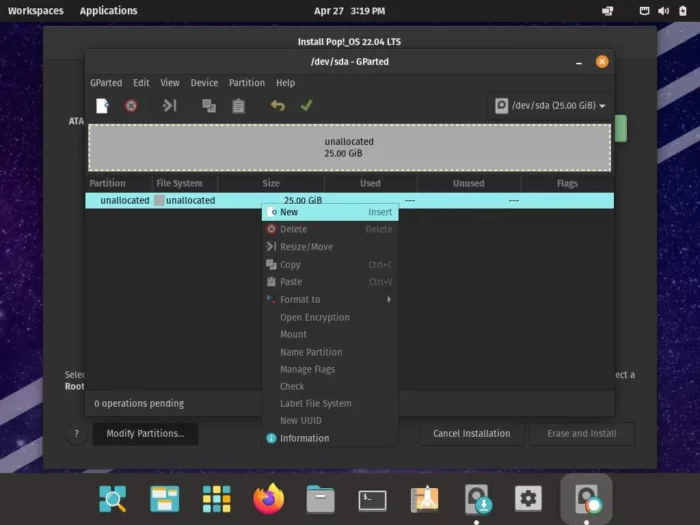
Find the partition you created in macOS (chapter 2), delete it — not the partitions where macOS is installed! You'll have unallocated space. Right-click it and pick New, or click the blank page icon at the top bar.
You need to create the following partitions (all should be primary):
- Boot partition: 500–800 MiB, FAT32
- Root: ~40% of remaining space, ext4
- Swap: 8GB (same as your RAM), linux-swap
- Home: everything minus 15GB, ext4
- Recovery: remaining 15GB, ext4
Check everything and click the checkmark (apply) at the top bar.
If you touched any partitions from another system, it could erase them. The guy in the video used labels on partitions — I had errors because of it. If you're getting errors, try creating partitions one by one without labels or names.
Flag the boot partition as esp — it's the FAT32 one you created. Right-click it, choose Manage Flags. Don't pay attention to other FAT32 partitions you didn't create — those are from macOS. Close the window when done.
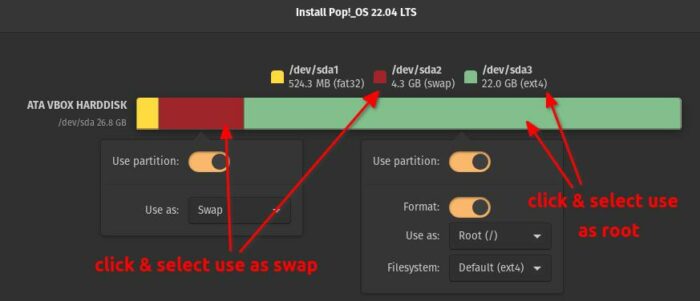
6. Assigning partitions
The video explains this best, but here's the breakdown. Every partition has a system-assigned name — now you assign it a function.
Find the boot partition on the bar, click it, toggle Use partition to ON and Format too. Use as should be set to Boot (/boot/efi).
When I picked the boot partition there was a warning that it was too small. I went back, removed everything I'd created and repartitioned — my boot partition had to be 10GB to clear the warning. I didn't care much about those 10GB, so let's continue.
Repeat for the other partitions except Recovery — choosing root for root, swap for swap, etc.
For Recovery, set Use as to Custom and type /recovery in the custom
field.
Click Erase and Install and follow the guide.
After installation, reboot as suggested. Keep the flash drive in until you finish setup.
No errors? The easiest part is behind you.
7. Post install
Plug in your mouse instead of the flash drive, so you have both mouse and keyboard. Plug in your phone and choose tethering, so Pop!OS has access to the web.
First thing: open this page in Firefox and install the script: https://github.com/t2linux/T2-Ubuntu-Kernel
Reboot — keyboard and touchpad should be working by now. Open terminal and run:
sudo apt update
sudo apt install -y refind
Reboot. You'll now be able to choose between Pop!OS and macOS at startup. Boot into macOS.
Open this page and go through the steps under the On macOS section: https://wiki.t2linux.org/guides/wifi-bluetooth/
Open the same page after booting back into Linux and download the same file again. Run it — commands didn't work for me so I just sudo-bashed it. 🙂
Internet's working. What else do you need?
Might want to go through this page as well, at least the first two sections: https://wiki.t2linux.org/guides/dkms/
If everything's done correctly, reboot and see your Touch Bar working.

8. Open questions
- Mic is not working — probably permanent
- Drive is not encrypted — see the EDIT section below
- Cmd button is treated as Super, so Cmd+C / Cmd+V won't work in terminal
- On every startup it shows "Displays set to HiDPI mode, select LoDPI..." and it's hard to get rid of until you open the notifications menu
- Touchpad scrolls in opposite vertical direction (just like macOS)
- Touchpad moves cursor slowly and scrolls very fast
EDIT: Encryption post-install
Full disk encryption can't be done after installation, but home and swap partitions can be encrypted. Here are the steps:
- Run
sudo apt install ecryptfs-utils cryptsetup - Add a new user with root rights — let's call them tempuser
- Log out and log in as tempuser
- Run
sudo ecryptfs-migrate-home -u yourmainuser - Log out and log back in as your main user
- Run
ecryptfs-unwrap-passphraseand save the output somewhere safe - Reboot — if everything's fine, delete tempuser
- Run
sudo ecryptfs-setup-swapto encrypt swap - Reboot
Source: https://www.linuxuprising.com/2018/04/how-to-encrypt-home-folder-in-ubuntu.html